Maxie Mail Subscription Sewing Box is Here!

You probably know how passionate I am about sewing, and even more so about sharing that love of sewing and the benefits it brings, not only to our souls, but to those that we love. I understand what expressing this inspiration does for us, and that we are fulfilling an innate need to create when we work with our hands. So this project comes from an anticipated plan to share with you in such a way that will nurture that creativity inside you and help build skills that will give you the confidence to tackle anything your sewing heart desires!

Maxie Mail Subscription Sewing Box.jpg

Maxie Mail is a subscription box for sewists that comes right to your door every month, filled to the brim with happiness that will include fabrics, patterns, new ideas and tools to help you be successful in your sewing room. But perhaps most importantly, my motivation for this box is to sweeten your skills month to month, growing your knowledge and self assurance! There will even be something personal tucked inside, just to celebrate you! And if you subscribe before October 16, I’ll include one of my favorite notions in your box!

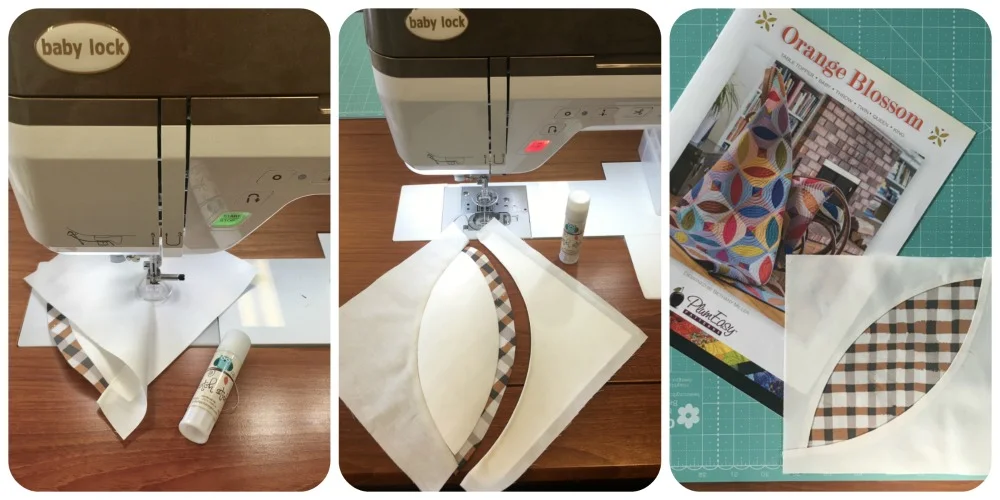
What's in the box? Having owned a quilt shop for over 12 years, I know the value of having the best fabric, quality tools and notions, well composed patterns and, of course, good instruction through either written or video tutorials. My box is packed with all of the above, and will include a password to the "Members Only" section where you'll find even more information, available exclusively to subscribers! Hop on over to the Maxie Mail Subscription Box page to read more about it and get started! It's as easy as 1, 2, 3!

Let's celebrate YOU! You get a value-packed surprise once a month, filled with something wonderful, easy enough for beginners yet sophisticated enough for the more experienced.

Thanks for visiting! Happy Sewing and God bless! Maxie

Lambkin Goes To Spring Quilt Market!

It's that time again...Spring Quilt Market with all the preparations and excitement for new fabric lines, notions and products! I always anticipate Bonnie's new fabric lines and have the unique opportunity to get my hands on them before they hit the stores! I'm excited to share two little quilts made from the line, with a video, (below) sharing a few of my favorite sewing features on my machine.

Little Lambkin loves it!

Bonnie's newest line, Lambkin, will be released by Art Gallery Fabrics in August, 2017, and it's justifiably as sweet as all her previous lines!

Lambkin Fabric by Bonnie Christine for Art Gallery Fabrics
Both Quilts.jpg

Both quilts are made using the new pattern, Orange Blossom, from Plum Easy Patterns by Bethany Miller. The petals are not fused in place, but sewn! Don't leave, please, I promise this is easy and that you'll love the technique Bethany uses! (I'll link to Bethany's video tutorial at the end of this post!)

Bethany uses freezer paper templates for perfect curved edges and seams. Her pattern is also layer-cake friendly for a scrappy look.

Orange Blossom Quilt by Plum Easy Designs

Let me share with you three of my favorite sewing features on Baby Lock's Destiny sewing machine (These features are available on several other Baby Lock models as well!)

Maxie shares three features on Baby Lock's Destiny sewing machine that make sewing easier, more accurate, and more fun!

Orange Blossom Blocks ready for assembly!
Orange Blossom by Plum Easy Patterns, made with Lambkin fabrics by Bonnie Christine for Art Gallery Fabrics

To view Bethany Miller's video tutorial for Orange Blossom Quilts click here! Thanks for visiting today! Happy sewing and God bless! Maxie

Make an Easter Apron Tonight!

Just in time to make that strawberry pie, this apron is a quick project, perfect for your cooking day on Easter or to tuck into an Easter basket as a gift! Made from a tea towel, nothing could be easier or faster to create. You'll be in and out of the sewing room in no time!


Tea Towel Apron

Supplies include a tea towel (I used Riley Blake's Bunnies and Cream towel and prints), 1/2 yard fabric for a ruffle and pocket, 1/4 yard for neck/tie strap and a scrap for the applique monogram.

Want to fancy it up a bit? Try adding an applique´monogram. I chose a circular monogram, like this one from Designs by JuJu, stitched on my Baby Lock Destiny. Using the camera for placement made it a breeze to center.

Applique´Monogram

After stitching the monogram, the first step is to shape the apron by trimming away a triangle from each top corner. Refer to the photo below to see the approximate size to trim away. Nothing is concrete here, just trim the corners, bearing in mind that you will fold about 1.25" to the back side and stitch along the edge to form a casing for the neck strap/ties.

Trimming the apron.

Next, round the bottom two corners. Serge or zig-zag all the raw edges. Press under 1/4" on the top, angled corners and fold about 1.25" to the back side. Stitch along the pressed edge to form the strap casing. Make the strap by cutting three 2.5" strips, width of fabric and sewing them end to end. Sew into a long tube and turn. A tube turner is your best friend here! For this long strap, leave the opening for turning in the mid-section. This allows you to stitch across each end for a nice finish, and turning half the tube at a time is much easier than turning the whole long tube.

Narrow hem foot. With a lamb.

For the ruffle, cut three 4" strips, width of fabric. Stitch together end to end. I like to use this rolled hemmer foot to finish each long side of the ruffle. It leaves a very professional, clean finish. Practice just a bit and you'll be a pro!

Ruffle edge with a narrow hem finish.

Fold under the short ends of the ruffle strip twice and stitch in place to finish the ends. Gather the ruffle strip to fit the apron's edge, beginning and ending at the bottom of the strap casing on each side. Lay the gathering over the serged/zig-zaged edged, overlapping the edge by about 1/2", and straight stitch it in place.

Run the tie/neck strap through the casings and toss on a sweet little pocket, if you like, and you're finished! Enjoy!

Thanks for stopping by! Happy sewing and God bless!

Maxie

Sewing: Repurpose, Up-cycle and Repair!

I love re-purposing things into something else, and starting with something that is already a finished product can save you loads of time! Take these sweet little bathrobes made for my sweet little grandchildren!

Terry Robes from Towels

When I couldn't find nice terry on the bolt (Really? I own a fabric store! No terry in stock!) I resorted to the softest terry towels I could find. I  found both a blue and a white that were large enough to make robes for Bear and Ollie. When I laid everything out on the cutting table I discovered that I could take advantage of the finished edges by laying the pattern pieces at the edges of the towel, allowing for facings and hems to be disregarded.

Layout of pattern piece on the edge of the towel.

See how the robe front piece is placed over the edge of the towel? The facing fold line is right on the finished edge, as is the actual hem line, which means I won't have to face or hem the edges! (I used Simplicity 8224.)

Robe layout.

You can see in the above photo that the sleeve and back pieces are also laid with the actual hem line at the edges, so no hemming anywhere!

Finished Robes made from Terry Towels

Finished in record time! Complete with a little belt, simply serged around all edges and attached at center back so it will never be lost!

Repurposed Sweater

And then there was this not-so-foxy sweater. It was a great sweater, but didn't fit me well. I hated to let go of it, so I repurposed it for Bear! I used the very same method of slipping the pattern pieces over the finished edges so that I didn't have to hem the sleeves or the lower edge. He loved it so much Bonnie could hardly get it him out of it for bedtime!

One more project...one of my daughter's beloved shirts sadly acquired a stain on a pocket. After 3 different stain removers didn't do the job, our last resort was bleach, which took the stain out along with the dye in the fabric. The stain was now replaced with a white spot! Removing the pocket was out of the question because the spot went through to the shirt front.

Shirt with stained pocket.

The back of the shirt has a lace yoke, so I decided I might be able to cover the pocket with lace. From my stockpile of old doilies, I found a beautiful lace runner that blended nicely. Placing the pocket underneath, I cut out a piece large enough to cover all four sides. Note that, once again, I let the finished edge help me along the bottom of the pocket! A fabric glue stick held all the edges in place for pinning and sewing it back in its original locale on the front of the shirt. Note: the top of the pocket is larger than the bottom to allow for an open, relaxed look. I re-attached it over the original stitching in the square shape to allow for the same finished look. Click on the pictures below to enlarge for detail.

Lace pocket

What do you think? No need to throw something out just because of a stain or ill fit! And you can repurpose things to be completely different things by using a little imagination!

Happy sewing and thanks for visiting! God bless! Maxie

Furry Friends Finished!

I making good on my promise to share these furry friends after they were given away as birthday gifts to my two grandchildren, Bear and Ollie! They were so much fun to make as 'in the hoop' projects by Dolls and Daydreams. I used dreamy cuddly fabric from EE Schenck, which was wonderful to work with!

These little critters are big! I used the 8 x 12 hoop, but Dolls and Daydreams includes sizes for smaller hoops in the file. My finished size, head to toe, is about 17".

Dolls and Daydreams In the Hoop Stuffed Toys
Big Caribou Reindeer by Dolls and Daydreams

As every part laid in place my smile grew bigger and bigger! This one is for Ollie Doe, my granddaughter, and her fabric body is from Bonnie Christine's line, "Hello, Ollie" for Art Gallery Fabrics. Of course, the fabric on Bear's Monkey is from "Hello, Bear"! What else would a grandmother do?

Tips on making stuffed toys in the hoop?

  • Keep tape handy for holding things in place. I used masking tape, but painter's tape and even scotch tape work well.
  • Cut furry fabrics outside and shake them well before bringing to the embroidery machine. You don't want all that fuzz to make its way down inside your machine.
  • When you've got all the limbs and ears, etc., assembled onto the hoop, tape them in place well so that they don't shift during stitching. Place tape on the stitching line because it helps the embroidery foot to glide up and over bulky parts.
  • For the last stitching (with the body back placed face down over everything) cover the whole piece with sticky tear-away stabilizer. This prevents the embroidery foot from getting caught against a stuffed limb as it moves around the hoop. It easily tears away after your finished. See below.
  • See the previous post for a short video on making the limbs.
  • Keep a sweet dog close by.
Dolls and Daydreams In the Hoop Stuffed Toys

Be sure to check out Dolls and Daydreams In the Hoop projects, as well as their sewing projects. Her instructions are great and her designs always stitch up beautifully!

Thanks for visiting! Happy sewing and God bless! Maxie